Design

Design
Showing posts with label Black & White. Show all posts

Thursday, 10 March 2016

Giving the Kitchen a Little Love


The other side of this room (which happens to be our only eating area), our kitchen, is getting a little (much needed) update this week.  I've never really liked anything about this kitchen and just had it painted when we first moved in, over six years ago.   I absolutely love the modern farmhouse look (check out my Pinterest board...hint, hint.) and I'm also loving everything industrial right now.  The look I'm going for is off-black cabinets, wood tones, range hood and white subway tile.  I've decided to keep the bottom cabinets and paint them out in an off black and then only take down the uppers and put up ikea shaker cabinets in an off white.  This is a very cheap reno, and I received a little cash for Christmas, so this is what I'm doing with it.  

We'll see how it goes...so far just a couple of hiccups...


Here's some of my inspo...

via 


via House and Home


 via House and Home

  via Nate Berkus

Saturday, 7 November 2015

Teen Girl's Room Before and After


Does anyone remember this room?   You know, the room I started over a YEAR ago...well it's done...well, I'm never really done, but it's basically sort of finished :).  I know all you designers/decorators out there know what I mean...done until the next Pinterest or magazine pic makes me go a whole new direction.  Anyway, here's my daughter's "finished" teen room.  (If you haven't been following along, you can read about the process herehere and here).


Here's a little peek at what it was before... a little shabby chic with pale green walls, vintage linens and soft pink accents...it was so sweet.


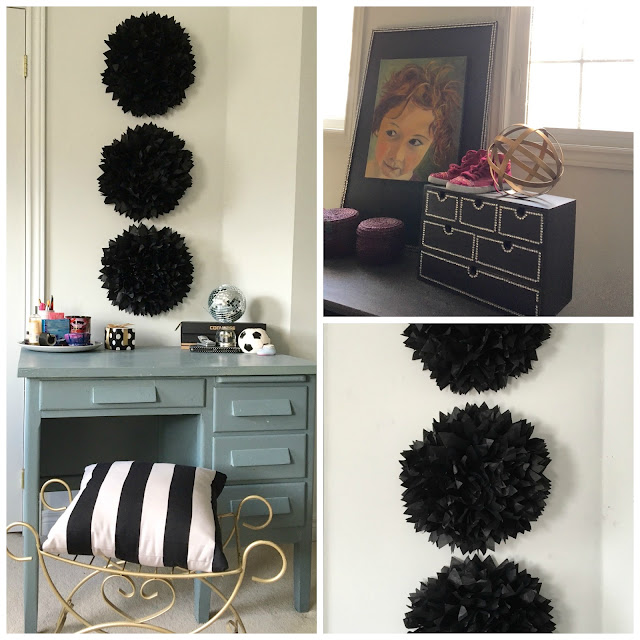
Ok...back to the teen room...I basically used all the furniture from before, with the exception of the gold Target side table and just painted the walls.  There's lots of cheap in this room...everything from the found iron bed, to the valance (which is simply a table runner from Homesense that I just cut in half), to the chair that a friend gave me (thanks Deb!) to the thrift store dresser and desk.  The window valance will probably change... a little too bright for a teenager in the morning...but until I find something I really like, they'll stay.  All the artwork I made...and the pompoms below are super cheap and add some dimension and texture.


Sources

Striped Bedding, Hanging Light:  Ikea
White Blanket:  Martha Stewart (many yrs. ago)
Faux Fur Pillows:  Pier1 Imports
Chevron Pillows:  Fabricland
Gold Table:  Target
Table Lamp, Valance & Pouf: HomeSense
Striped Cushion:  SuperStore
Ceiling Light:  Home Depot
All Furniture:  Thrifted


Sunday, 20 September 2015

Backyard Pergola Reveal


So every blogger out there seems to be posting all their fall decor, and I'm still talking about my backyard!  To be honest, I'm not quite ready for fall, and I always find it hard transitioning from my favourite season, summer, to fall... hey life goes too fast, why rush it?


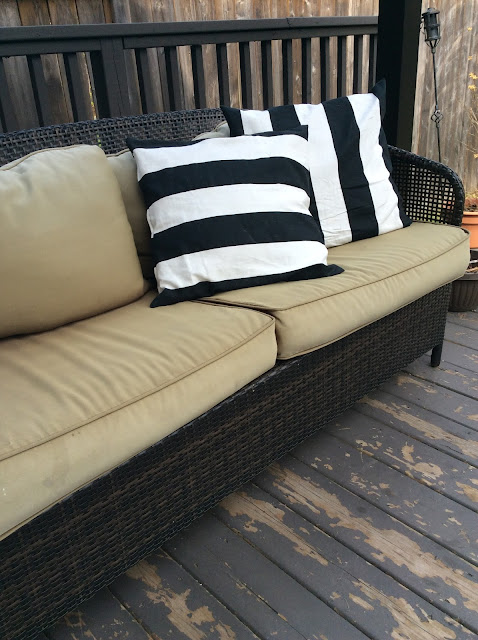
So this space (which is half of our back deck) all started to transition last year when I purchased a pergola from Home Depot which we are extremely happy with.  Then this year I picked up these striped cushions from the Superstore and painted these very basic brown cushions.  I've had great success at the Superstore...we got our patio set from there a few years ago, and most recently these black metal side tables.  They were $10 each on clearance.....wow!  I'm sure I'll bring them in for the winter and use them somewhere in the house.  I like to use as much of my outside furniture inside over the winter.  Like my ratan chairs, I always bring them in and use them in living room.  Oh and I move the lanterns in for the winter too.


My original thought was to buy three side tables and then stagger them as an alternative to the original coffee table that I got with my patio set...which is a little too ordinary and boring for me.  But I'm eclectic and also don't like everything to be so new, so when I put them in the space I actually decided to use a bench from my picnic table set as the coffee table.  Then I moved the coffee table to the side for extra seating (see below) and placed my seat cushions and roll top cushions on top for extra seating.  I actually really like this look and it mixes it up a bit. Also the seating is quite low so the eye continues into the garden.  I love to use things in an unexpected way...which is also why I use my birdfeeder as a planter (see below).


One more thing I did this year to the space was replace my curtains that I made last year from drop cloth.   They had a plastic liner which I thought was a good idea at the time but turns out it wasn't, because it held in the moisture and blew in the wind (what was I thinking?).  So this year I made more curtains out of a drop cloth without a plastic liner and I like them a lot better.

The jute rug seen here is actually from my dining room.  I just propped it with this one to see if I liked it...and I do.  So now I'm on the search for an outdoor one.  I found one at Lowes in the spring, but when I went back to the store to purchase it, they were sold out. :(

Hoping to get a few more nights on this back deck before the cold comes. 


Wednesday, 29 July 2015

Quick Fix for Old Faded Outdoor Cushions


Hey I'm back....I've taken a little time off just to relax and enjoy the summer.   Hope you're all having a good one.  We're currently experiencing a heat wave, but other than that we've had great weather here (just north of Toronto).

This post is for all of those who have tired, old worn-out cushions on their outdoor furniture.  That's what these white cushions once were.

 If you follow me you know that last year I purchased a pergola for the space, and a few months ago, got these amazing striped cushions. Problem was, the cushions on our patio set (also from the SuperStore end-of-the-season sale a few years ago) were originally dark brown and had faded.  I was never a big fan of the colour, but liked the style of the furniture and it was on sale.  Anyway, I was looking at them one day and thought, how do I change the colour to white without slipcovering (too expensive) and without buying new ones (hard to find the exact size and not in the budget).   Of course, my go-to is always to paint the fabric (I've done this before here and here) so I had some latex paint left over from another project and decided to try it...AND it worked!   Now they are a little crunchy but they look amazing, and I couldn't be happier about this quick fix.  They're also super water proof now so that's a bonus.   Hey, it saves me buying new ones or having slipcovers made.


Here's the crazy ugly before pic.  (Oh and the floors have to be repainted too...I need to find a really durable outdoor deck paint).


More of my backyard/pergola updates coming soon...have a great day!

(This post is also for Rana my crazy friend/follower who had worn out canvass runners. She remembered my post about painting fabric and painted her sneakers instead of throwing them out.  Glad I inspired you Girl!)


Monday, 25 May 2015

Black & White Out Back


Last year I did a little post about black & white outside because it's one of my favourite colour combos for outside or inside.  (Actually, I have a lot of black & white in this house...not sure why.   It just sort of happened.)   It just makes all the other colours stand out and I love it with the dark green of boxwoods, ferns and grass.  It's just such a classic look.   So I was a little excited when I happened upon these cushions at the Superstore a few weeks ago.  The little cushions were $9.00 and the larger ones were $20.00.  They also had roll cushions and lounger cushions in the same stripe, but they're going very fast.  

It's been so cold here I've only purchased a few of my annuals, and haven't planted any in the ground yet.   Last week I had to bring them in at night because we had a chance of frost.  The ones above are the African Daisy and the Double Petunia.

Here's a pic of the seat cushions.  The previous owners built a bench right into the railing of our back deck so these cushions fit perfectly here for extra seating.  I really need to get painting this back deck because it's chipping.  I'm thinking of painting the deck and the back fence in a very dark grey - almost black.  Which might be a little hot on the toes on the back deck but would look spectacular on the fence.   It's a great backdrop for plants and would really make my Hydrangeas and Rose of Sharons pop out.  It's a project that might have to wait until Fall or next Spring.


And some more news....my French Lilac that I planted five years ago finally bloomed.  (Now imagine this Lilac with black behind it instead of the weathered wood...amazing right?)


Here's a closeup of the Lilac...love all the textures and colours.   My peonies are just about ready to bloom and they are one of my all time favourite flowering shrubs.


And one more thing....I started to paint my stairs...eeek!  But I screwed up and now I have to remove some of it.   I don't like painting, and I really, really don't like removing paint.  
 More on that later.

Thursday, 22 January 2015

Cool Finds at Home Depot


 I ran out to Home Depot recently to get a paint sample and while I was waiting I found some pretty cool things. Not only are they all stylish, they're all very reasonably priced.   First up are these beautiful rugs.  I found these wool rugs hiding in the middle of their Special Order section.  They come in all different sizes and colours including dark grey, light grey and black.  (In the store the 5' x 7' was under $200.00.  The link above was the only one I could find).


Next up I found this stunning Moroccan grey and white marble tile.  Love this tile!  I also found the grey and white marble subway tile...these would look amazing together in a kitchen or bathroom.  
(Sorry but I wasn't able to find a link for the first tile).


I also really like this retro, black and white hexagon tile below.  This would be perfect on a bathroom floor.


And last up are these industrial lights.  (I'm loving industrial right now).  These were all under $100.00 each and would look great in a kitchen, laundry room or kids' room.


Tuesday, 6 January 2015

My 2014 "Benchmarks"


In looking back over this year, my first year of blogging, I seem to have taken a lot of pictures of benches - built-in or otherwise.  So I thought it would be cool to recap my 2014 by showing all the benches I've taken photos of.  I don't know why I like them so much...I think I just find them classic and relaxing. 

Above is an old church bench painted white which sits in the porch of our friend's country home. I took this shot during our trip up north in the spring.  There was actually one exactly the same on the other side of the room, but the shot was too wide for me to take (with my iPhone), so I just took the one side.  The pic below is the inside of this same house and this bench is a great idea.  When you have a small eating space, make the window into a seating area and move the table over.  Great use of space!


The one above is from my friend's gorgeous country kitchen and below, a garden tour in June.  


The four benches below were from our end of the summer Muskoka trip.  This "cottage" was amazing inside as well and had built-ins in every bedroom and at the front entrance.  The one below at the entrance also had drawers and a cubby flanking it which I thought was perfect for storage.  The window seats in the bedrooms also had drawers under them for extra storage.


These two benches below remind me of England and have  black and white striped cushions to add to the classic look.  


And last but certainly not least, is this outdoor bench I saw this Fall.


Just want to thank you all for following me this year on this blogging journey.  I hope to continue to bring you photos of beauty and inspiration from wherever life takes me.  My goal has always been to show people that good taste and design doesn't have to cost a lot.  

I'm hoping to focus a little more on my clothing and fabric designs this year.  As much as I love interior and garden design, fashion design has also been a real passion of mine.  I often wake up at night with a design in my head and have to draw it right away before I forget it.  I'm also working on some fabric designs which I hope to share with you soon.  (It involves technology, which is not my thing, so it's taking a bit of time).

Remember, you can follow me on Google, Instagram and Pinterest.  And to those who are already following, thanks again for all your support!


Monday, 15 December 2014

More Changes to My Daughter's Teen Room


 This room is slowly, and by slowly I mean very slowly, coming along.  My daughter is learning patience.   Hey it's a good life lesson to understand that we can't always just go and buy whatever we want. Some times we have to wait for things...what a concept!  If you follow me on instagram you've seen this pic before.  I found this cute gold accent table at Target for under $80.00 and thought it just looked amazing against the black wall.  Then I decided that all that gorgeous Kate Spade framed paper would look amazing above it.  I also found a cool metal hashtag and "at" sign at HomeSense  and along with the "B" I made earlier, decided to make a collage above the accent table.  I originally had a bookcase here but I thought the gold table looked so much better, so I moved the bookcase to the other side of the room.  Then I wanted a light for above the bed, and was thinking about making one, but spotted this one at Ikea.  The cord and shade combined total was under $20.00.


This is what the light looks like fully assembled.  Pretty cool right?  I love it against the black wall.


One other project I completed was fixing this old bulletin board.  I decided to paint the inside black and add gold thumb takes to the edge.  I then rubbed gold paint into the edges to just give it a bit more gold.  Easy to do and the result was a big change.  It actually is one of my favourite things in the room, and again, not expensive.  You can see the process of this room here and here.


Monday, 4 August 2014

Teen Room Update


Here's a little peek at what I've been up to the last couple weeks.  We finally got around to painting my 
daughter's room, and...what a transformation.  I love it.  More importantly, she loves it!

I decided to paint two walls black and the rest of the walls cream.  This bed will probably look more like a daybed when it's done, but I just wanted to show you the progress.  She's on the fence about keeping this gorgeous iron bed, which I absolutely love.  My sister found it in her barn - can you believe that?  I love it against the black wall.


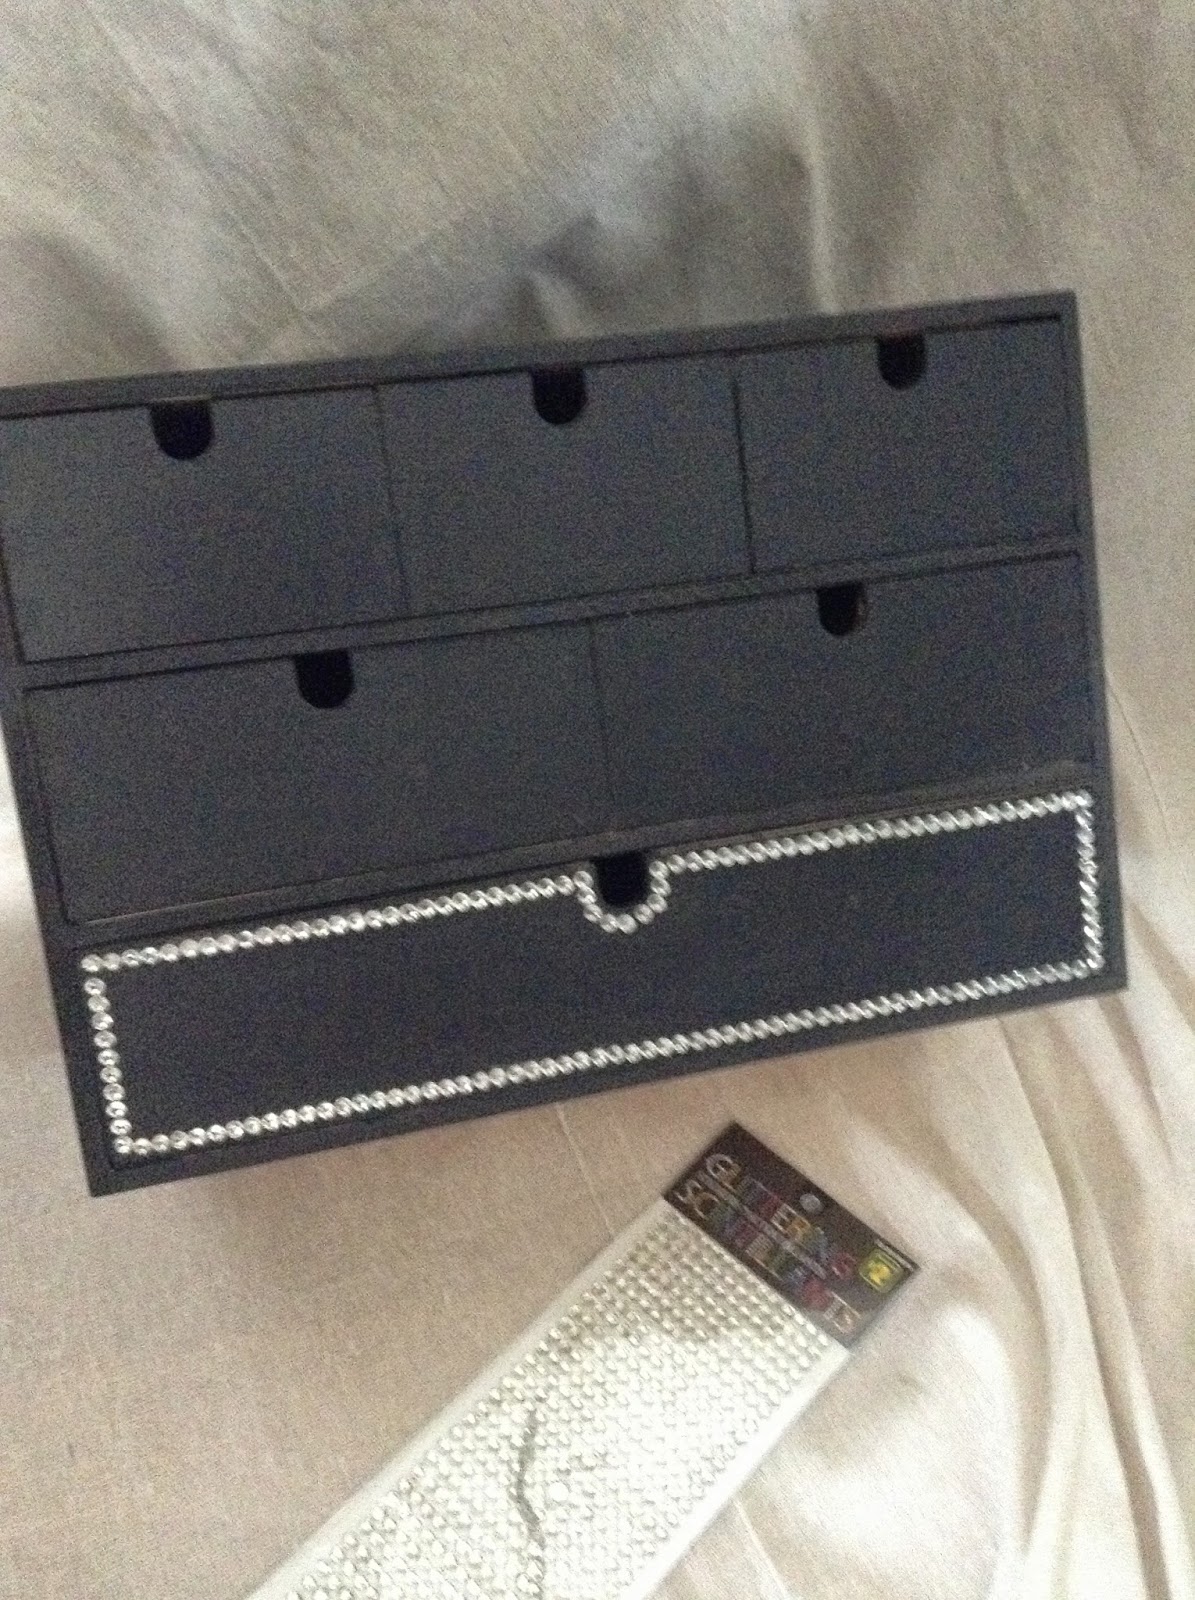
We've also had some fun this summer doing some "glam" projects for her room.  We hacked this Ikea wooden drawer set (which I don't think is available anymore) by painting it black and adding some "bedazzle".   I purchased these "jewels" from a dollar store and then glued them on with  fabric glue.  They come in adhesive strips of about 12, but the adhesive isn't that strong so I had to use a stronger glue.  A bit tedious, but worth the effort.


I also traced her initial, "B", and outlined it in "pearls" and used the same process above to apply them.


I'm thinking of making this for lighting in her room to add some real drama against the black wall.  I'm also going to be busy painting some of the old furniture, so I'll keep you posted.