Design

Design
Showing posts with label painting. Show all posts

Sunday, 11 December 2016

I Painted a Faux Brick Wall!!!


In an effort to make my Newmarket builder box home look a little more like New York , I decided it would be a good idea a few weeks before Christmas...what was I thinking?... to sponge paint my front hall.
  I absolutely love brick walls...every time I'm out and see one I take a pic because I just love that industrial look...I thought about doing the faux brick wall panels, the peel and stick wallpaper, or using plaster and tape.  However, if I decided I didn't like it or got tired of it in three months (which happens a lot around here), then I would wreck my walls and be stuck with it.  So I decided to buy a sponge and bought one that was for the end of a mop, like this onewhich co-incidentally happened to be the exact size of the brick on my house.  Then I left the dark grey on the walls (Metropolis by Ben Moore) and used some paint left over from another project and just went for it.


So here's what I did:

1.  dampen sponge slightly.

2.  put a light coat of paint on the sponge with brush.

3. start in far lower corner and work up the first four or five rows.

4.  place sponge on the area and move back and forth slightly (lightly wetting the sponge helps with moving it).

5.  try to keep each brick above the other in alternate rows as you move up.

6.  once you do a few rows moving up, then move horizontally across the wall keeping them straight as you go.

7.  when all the bricks are on the wall, then put a little bit of paint on the sponge and dab it in between the bricks.

Bricks are very forgiving...they aren't perfect.  Don't be afraid if you screw up.  You can go back over it and make it darker. Just remember to keep your bricks straight.  If the bricks start to become uneven, you can always lengthen or widen a brick...again, bricks are imperfect.   I also did this over a few days, an hour or two at a time.  


So now my challenge is finding the right mirror and lighting...I shopped my home for lighting and like this one (above) from Homesense, but I'm not sure about the mirror....  (I know, I'm missing a drawer pull.)  


And then I decided to paint my doors a beautiful black called Vulcanite by Ralph Lauren.   This is the colour I'm going to be using on my lower cabinets for the kitchen (I know it's been a very long time coming but they are finally being painted in January...patience, people).  So it was an opportunity to test it and make sure I like it and I do, I really really do. ...I've wanted to do this for years too.  
Oh, and we got the most ADORABLE Christmas tree ever...and to bypass the annual hours and hours of the Christmas tree falling over,  I just stuck it in a basket...It might turn brown but it won't fall over! 


Isn't she the cutest little tree?   Axel has been circling it like a shark...which is why it's now up high and in a basket.  


Thursday, 8 October 2015

I Did It...I Painted My Stairs Black!


So my stairs finally got painted...and wow, what a transformation!
I know I say this all the time, but I can't believe what a difference a little bit of paint makes. 

This was a pre-owned home so unfortunately we weren't able to choose any of the finishes.   When we first moved in I painted the railings a dark grey (Iron Mountain by Ben Moore) to make them a little more bearable (see below).   The light floors and railings wouldn't have been my first choice, but I was very grateful for the hardwood.  Also, the stairs had beige carpet running up the middle of them (yikes), which over time was starting to look a bit nasty.  

I delayed taking up the carpet because sometimes builders cheat the hardwood on stairs to cut costs, and put a cheaper wood where the carpet is.  Fortunately, we had hardwood all the way up...whew!   The next challenge was taking all of the staples out of the stairs.  This next step took a really long time and it was a lot of hard work.  Let's just say that the guy that had the staple gun went a little crazy...some stairs had over 20 staples. .


Next I had to choose paint, and had heard about Fusion Mineral Paint on Instagram from The Learner Observer.  I saw that she was painting her stairs with Fusion Mineral Paint, and she was nice enough to answer all my questions.  This paint is used mainly on furniture so it was great to see it used on stairs.  The good thing is it really adheres to rough surfaces and goes on smoothly...so no brush strokes.  Also, it's not very thick and is very runny so a little goes a long way...one small jar did the railings and stairs.   I wanted the colour to be an off-black so I mixed equal parts Ash (dark grey) and Coal Black (very black) until I got the colour I wanted.

My original thought was to paint them all black and then I decided I liked the look of the light stairs and the dark risers...oops!...(like a really big oops!.. like run
 to your neighbours' house as fast as you can and borrow their sander oops)!  The last step, once they were sanded, was putting  a light coat of sealer on them.


Before


Ok so here's the before and after...keep in mind that the before is quite a 
few years ago...big difference!

After


I just realized that I've never really shown this front room's before and after pics...probably because it changes every week....before and after pics coming soon.  

Also, I really want to try another project with this Fusion Mineral Paint.  I'll give you a hint...it has to do with the bathroom but it's not the vanity.  Can you guess what it is?


Wednesday, 29 July 2015

Quick Fix for Old Faded Outdoor Cushions


Hey I'm back....I've taken a little time off just to relax and enjoy the summer.   Hope you're all having a good one.  We're currently experiencing a heat wave, but other than that we've had great weather here (just north of Toronto).

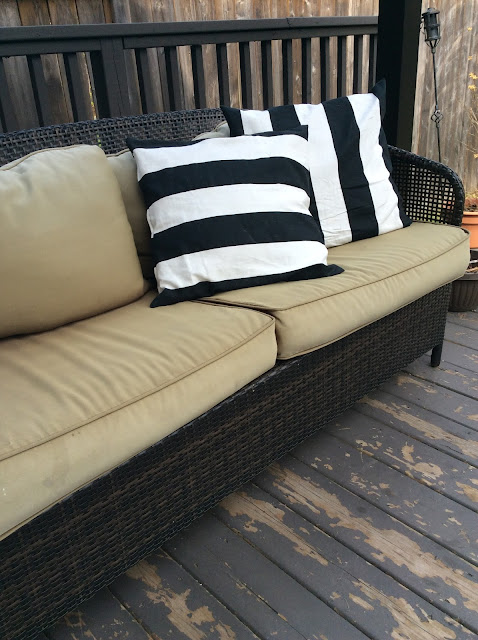
This post is for all of those who have tired, old worn-out cushions on their outdoor furniture.  That's what these white cushions once were.

 If you follow me you know that last year I purchased a pergola for the space, and a few months ago, got these amazing striped cushions. Problem was, the cushions on our patio set (also from the SuperStore end-of-the-season sale a few years ago) were originally dark brown and had faded.  I was never a big fan of the colour, but liked the style of the furniture and it was on sale.  Anyway, I was looking at them one day and thought, how do I change the colour to white without slipcovering (too expensive) and without buying new ones (hard to find the exact size and not in the budget).   Of course, my go-to is always to paint the fabric (I've done this before here and here) so I had some latex paint left over from another project and decided to try it...AND it worked!   Now they are a little crunchy but they look amazing, and I couldn't be happier about this quick fix.  They're also super water proof now so that's a bonus.   Hey, it saves me buying new ones or having slipcovers made.


Here's the crazy ugly before pic.  (Oh and the floors have to be repainted too...I need to find a really durable outdoor deck paint).


More of my backyard/pergola updates coming soon...have a great day!

(This post is also for Rana my crazy friend/follower who had worn out canvass runners. She remembered my post about painting fabric and painted her sneakers instead of throwing them out.  Glad I inspired you Girl!)


Saturday, 11 April 2015

I've Been Painting Things Again


I've been doing a little painting & a big switcheroo lately around my house.  I'm beginning to think this is a pattern for me..seems to me I did this last winter.   (Like the sideboard above..it's moved).  We've lived in this very basic builder home now for 5 1/2 years, and it's taking a while - and some cash, to slowly transform it.  It's complete with light floors, stuccoed ceilings, and lots of "boob" lights...I'm not complaining, I'm just stating the facts.   I see it as a great challenge having only lived in century homes before, to transform this house.  I'm a firm believer that you don't have to have a lot of money to make a home look good, but it may take a little more time...and a lot of paint!  

 I seem to be painting everything dark gray or (as I call it) almost black. When I moved into this home I wanted everything very calm and serene so I painted a lot of the furniture a soft gray.  We had just come out of a very stressful time in our lives and I wanted a calm space... now for some reason, I'm going almost black.  I have a great love for French & English antiques (like Anton & K and that whole gray, black, taupe thing they have going on).  I first decided to change out my dining/kitchen light from a little drum light to a massive dark gray Hektar pendant light (below).   What a change that made... talk about lighting drama.  Also, things started to go a little industrial farmhouse so I painted this sideboard black (which actually is an island from Home Depot but I use it as a sideboard in this house). I've talked about this before...painting & changing the use of a piece of furniture.  (You can read about it here.)  I then got these massive baskets from Target, which is sadly leaving Canada, but that meant that I got them on sale so that was good.  

The "dining room" in my house is actually part of the kitchen, so I was going for a little more sophisticated look.   I usually like my spaces to have a more relaxed sophisticated look...hence the Hektar and gray velvet curtains.  (Just an aside here, when a house doesn't have a dining room, I think it's important to treat the eating area in the kitchen like a dining room).  This space has always been a work in progress, and I need to get an area rug and  slipcovers for the chairs... the list goes on.


Then I decided to paint the white shades on the lamps black. I just used some latex paint I had left over from another project and started painting.  I painted fabric before when I painted my pillows.


Then I went to the front hall and decided to paint my hutch black. I found this hutch at a garage sale about ten years ago. It houses all our stuff...you know, the stuff that everybody needs just inside the front door. Still need to get pulls for the drawers though.

Before


After


Are you still with me?  There have been a lot of changes, and I haven't even talked about my master bedroom yet ...it's changed too.   


So here's the lamp I painted in the master bedroom.  It's an antique light that I got at a thrift store years ago for $17.00  that I had stored in the basement.  Originally it was red and then with all the painting I thought..wait a minute...what if I paint that red light black and get a black shade? And what a change.  (Just an aside here,  "Unbroken" is an amazing book.  But definitely not a light read.) 

Oh ya, and I moved a couch into my master bedroom because I switched the family room all around.  But more on those two rooms later.

Here's a little sneak peek at the family room with the painted lamp shade. 


 I haven't painted these yet, but I still want to do it!  

Have a great weekend!!!


Wednesday, 11 February 2015

Contemplating Black Stairs

 via 123abc.tumblr.com

So this is what I'm thinking of doing...painting my stairs black.  I first got the inspiration last year when I fell in love with this house.  I've lived with light hardwood for five years now and although they are hardwood, I've never liked the colour.  I've actually never liked the more traditional handrail either so this would be a relatively quick and easy fix.  (Well maybe not that easy but relatively quick).  The first year I was here I painted the handrail a very dark grey to hide it a little, and this year I removed the runner that was going up the stairs. I always say you should make your space the best you can with what you have and that it should reflect you.  But the stager in me always thinks I should keep my space open to appeal to as many people as possible just in case I have to sell... so I'm a little torn.  (Especially since this would be permanent).

One of the biggest issues will be finding the right paint that will withstand dog and people traffic.  I recently heard about this amazing eco-friendly paint called Fusion Mineral Paint.  It's supposed to be fantastic for furniture and they even have a special sealer for high traffic areas like stairs and cupboards.  The issue for me is that the colours come premixed.  They have a grey and a jet black but I want an almost black like Off Black by Farrow & Ball.  If I go with this type of paint I'll have to buy the black and white and then mix it myself to get the right colour (which I do all the time anyway so that doesn't scare me).  


 via remodelista.com


  via desiretoinspire.net

 via littlegreennotebook.blogspot.ca

I'll keep you posted on this...still have to convince a certain someone, and find the time when no dog or kids are around for like 12 hours. Wish me luck.


Thursday, 9 October 2014

Teen Room - Painted Furniture & Cheap Decorating


So it's been quite a while since I updated you on my daughter's teen room (like a couple of months).  If you haven't been following along, you can see where I started from here and the progress here.  I painted 1 1/2 walls black (which was custom but very close to Ben Moore Black Iron 2120-20) and the rest of the 2 1/2 walls white ( Ben Moore Soothing Mist OR483) so it's quite dramatic. 

 I finally got around to painting the furniture as well, which I'm absolutely loving. Keep in mind that all these painted pieces of furniture were purchased at garage sales, auctions or found.  The dresser we found at an auction about 20 years ago, and it's been white and green and now black.  The book shelf we found at a yard sale (before pic is below) and I painted the outside black and the inside white.  Then I found this amazing Kate Spade double-sided gift wrap at Chapters.  It's got gold polka dots on one side and black and white stripes on the other.  Beautiful!!  So beautiful, in fact, that I decided to line the back of the bookshelf with the black and white and then frame a swatch of each.  Talk about cheap decorating.  I had these frames I wasn't using, so I was able to just take the pictures out and leave the back on and glue the wrapping paper to it. 

Before


Since this book shelf is long and narrow,  I decided to attach the paper with the stripes going horizontal instead of vertical.   I absolutely love the black and white stripes against the dramatic black wall.   Oh ya, I also decided to tie a feather boa around the boring lamp shade to add some drama.   


Here's one more update - I also got some big, over-sized fur cushions from Pier1 Imports and a couple of chevron cushions at Fabricland ($10 for just the cover).  If you follow me on Instagram, you'll know that these chevron cushions keep moving to other rooms.  Not sure if they're going to stay in this room or not.


So there's your update!  

I just want to remind you that decorating does not have to be expensive, and painting a piece of furniture can really bring new life to a space.  You can check out some other furniture I've painted around my house here.

Have a great day!!!

Wednesday, 4 June 2014

Staging Tips - What Message is Your Home Giving?

 After

Right now is a hot time to sell a home so I thought I'd show some more before and after shots of some staging I've done. I've talked to many realtors who don't use stagers and I've even had some tell me they don't see the point  in having a stager if the home is clean.  I will never understand this.  Every home needs to be staged.  If your realtor is saying this to you, I would suggest that you get another realtor because they are not looking out for your best interest.

I think the myth about stagers is that they just stage empty homes.  The reality is that typically, we go into furnished homes and tweak each room to make it appeal to a specific target or to most buyers.  Sometimes this means renting furniture but most often it's just using what people have in their home or in storage.  We are also restricted to the seller's budget and work within their financial means.  Not only do stagers make the home look better, they also look in every corner and see what your house is saying.  That's right - your house is sending messages.  

This home was an estate sale.  Stagers are really good at helping people in this situation decide what to keep, what to store, what to paint and how to move forward with the sale of the house.

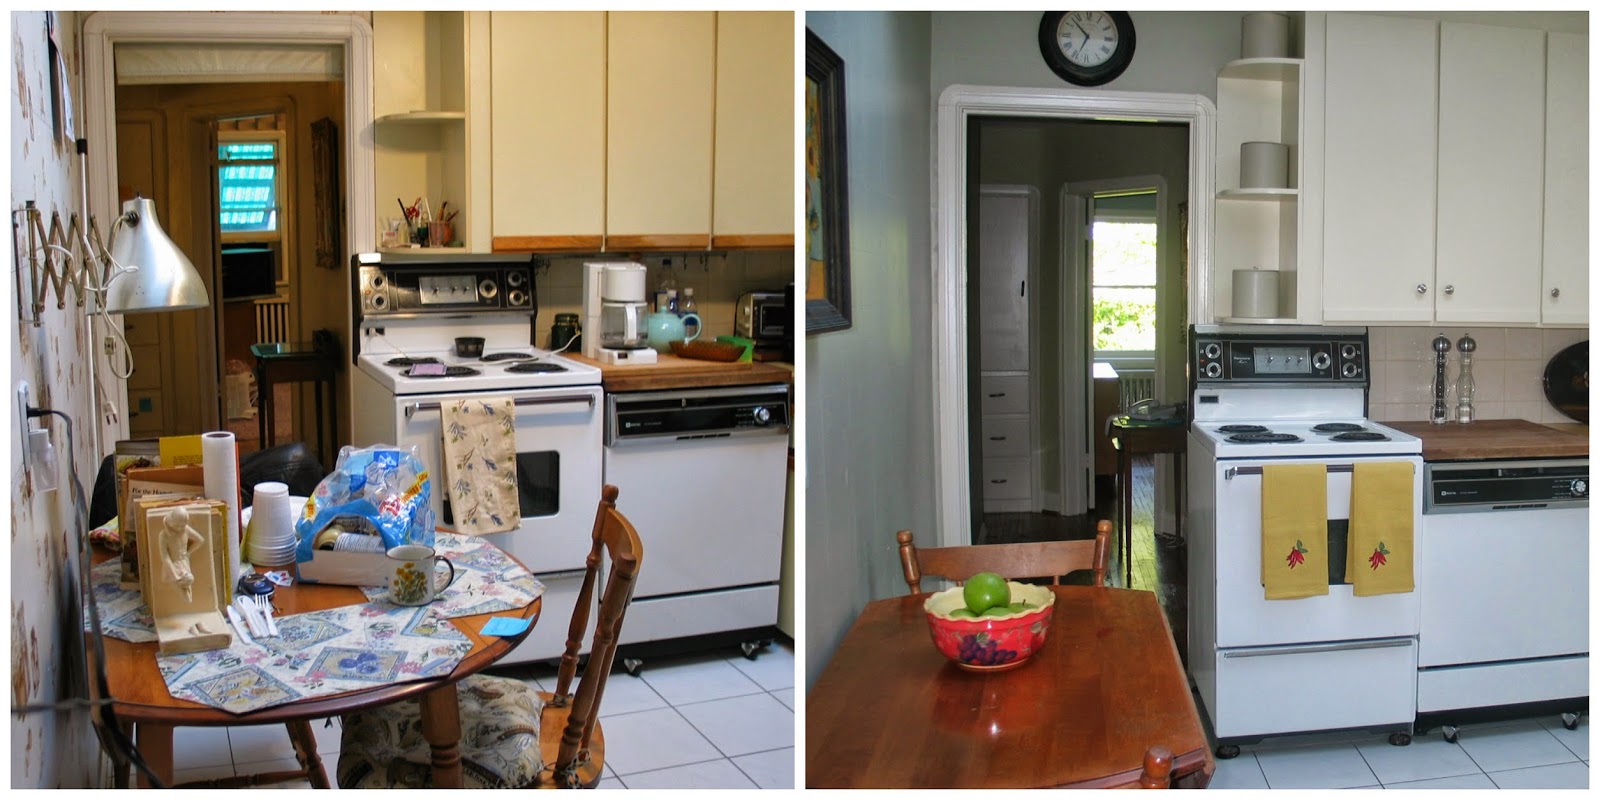
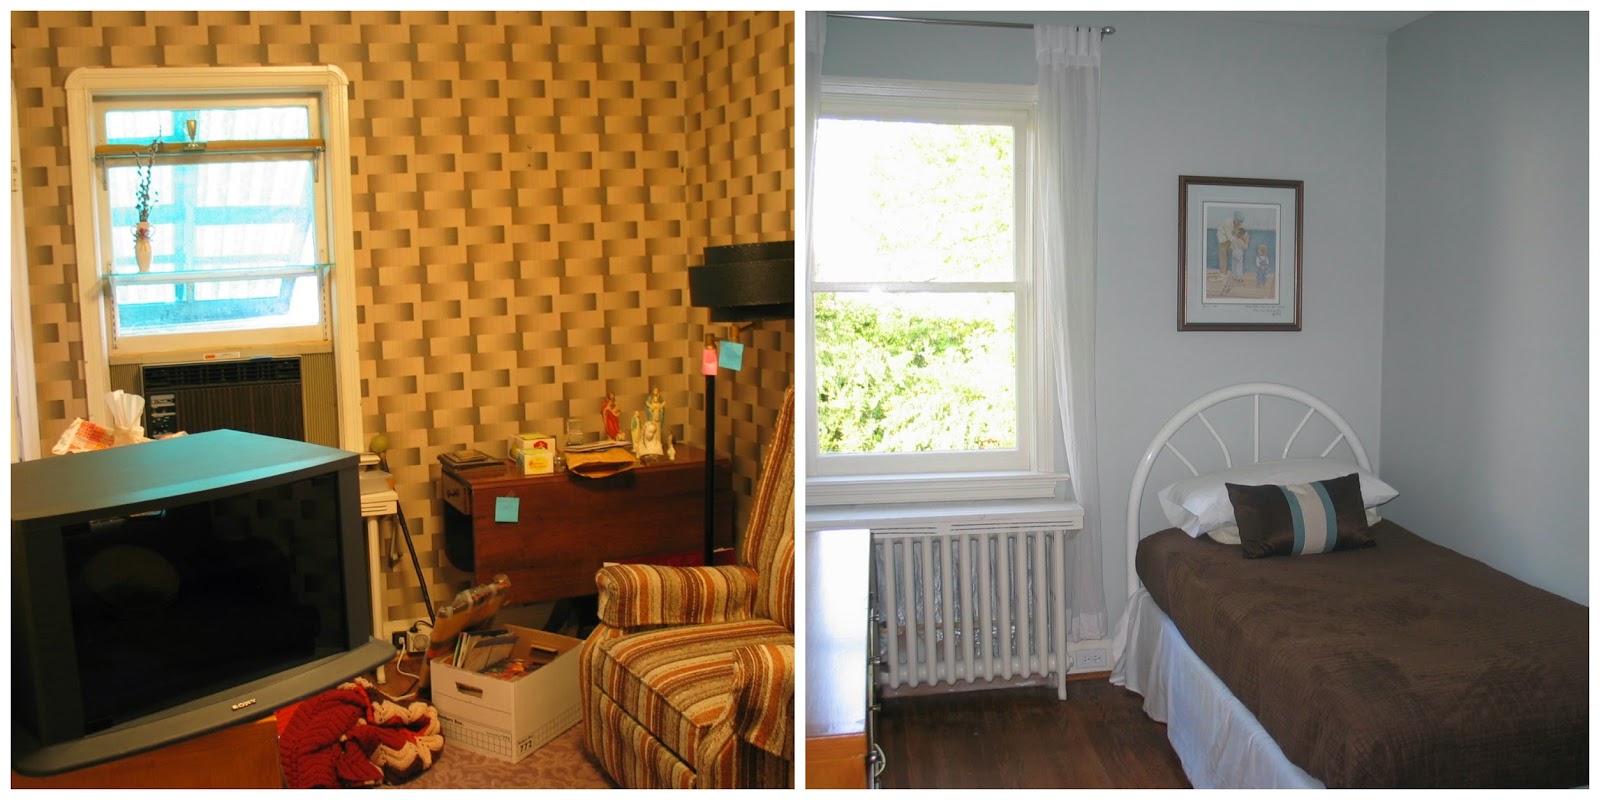
The message this house was giving before being staged was that it was very hot (AC in window), that it was an estate sale (old furniture), and that it was tired and needed updating (dated wallpaper).

The dining room just needed the built-ins and walls painted, some new styling and some window treatments.  This home had some beautiful antiques, so I was able to use most of the furniture.  You can see above that I chose to hang the window treatments high and bring them to the floor to add some much needed drama to the windows.  I also chose taffeta curtains to add some elegance and richness to the space.

Before and After


 After
This room didn't have a real purpose before I staged it.  It was a storage room with 1960's wallpaper.   This was a child friendly neighbourhood, so I knew that a family might be buying this home, which made it very  important to create a child's room.  We wanted to send the message to buyers that this was a child friendly house.    I also used a very neutral and calm gray/blue called Nickel by Pratt and Lambert on the walls so that the room could be used for other purposes by the new owners if they wanted.  By painting the walls, placing a bed in the room and putting up window coverings, this room was transformed.  

 Before and After


 After

This kitchen was a little overwhelming so again, I toned it down by painting a neutral colour on the walls  (Sea Glass by BM) and painting out the dated cupboards.  This is an easy fix if you have these 80's cupboards.  Just painting the wood portion out the same colour as the rest of the cupboards and changing out the pulls can quickly update the look.  I chose to keep the table in the kitchen because most people like a space to eat in their kitchen so it's a good selling feature.

Before and After


After painting, fresh linens and window treatments, this house didn't give any negative messages.  To see some of my other staging tips you can go here.

When you're selling always have your home staged.  Remember stagers are not just looking at the aesthetics but are also looking at the messages your house is giving.


If you live in York Region and need a stager, just e-mail me for rates.


Monday, 28 April 2014

Painting, Painting and More Painting


A few posts ago I mentioned that I've been painting something other than walls and this is what I've been painting - cushions.  I bought these from HomeSense a few years ago and I love them, I just needed a change.  I painted the walls a dark gray (Metropolis from Ben Moore) way back here and now the cushions just go better with the walls.  For the cushions, I used some paint called Iron Mountain from Ben Moore that I had from another project.

Here's the before and after.


This is not the first time I've painted on fabric.  I did it about a year ago on a piece of painter's drop cloth.  I had this big space above the landing that I needed to fill.  I painted the drop cloth using Intercoastal from Pratt and Lambert, cut out my pattern and then traced my pattern in chalk before painting it.  I've read a few articles recently online about using a Sharpie to make patterns on fabric which I think is a great idea.  I might try this on fabric when I do my teen daughter's room.


 I also bought a can of flat black spray paint and re-did my gold door handles and hardware.   I used Rust Coat by Beauti-Tone, and what a big difference!!  I  now have about 10 more doors to do upstairs.  This is quite an easy update but a bit time consuming.  I'm not going to do a big tutorial, but if you decide to do this make sure you have something to place them in because they will roll.   Also, just be careful when you put them back on that you don't scratch the paint with the screwdriver, which is what my husband did when he tried to help.  (He's not a handy guy).  It reminded me of the time he tried to re-fasten the rearview mirror in my car, and ended up cracking the windshield.  I could go on....

Here's the before and after.


I've been making some progress in my laundry room, so I'll post about that soon.

Have a great week!